![kt cloud [Tech blog]](https://tistory1.daumcdn.net/tistory/4226485/skinSetting/5f51ae7c887a4da787cd295f70f910e5)

안녕하세요 '5분이면 따라하는 KT Cloud Open API 활용팁 2편'입니다.
이번 시간에는 KT Cloud의 Python SDK를 활용해서, 실제로 Cloud 자원을 배포하고 확인하는 작업을 소개드려 보도록 하겠습니다.
작업 시나리오 - Single VM 생성(Web Server구동)
KT Cloud Open API를 본격적으로 활용코자 하는 첫번짹 작업으로 간단한 아키텍처를 하나 구성해 보고자 합니다.
아래 그림과 같이, KT Cloud의 가상서버를 1대 생성하고 해당 가상 서버를 인터넷에 연결될 수 있도록 접속설정(포트포워딩)해주도록 하겠습니다. 그리고 이 가상서버에는 간단한 웹서버(httpd)를 설치하고 서비스 가능하도록 설정하도록 할 것입니다.
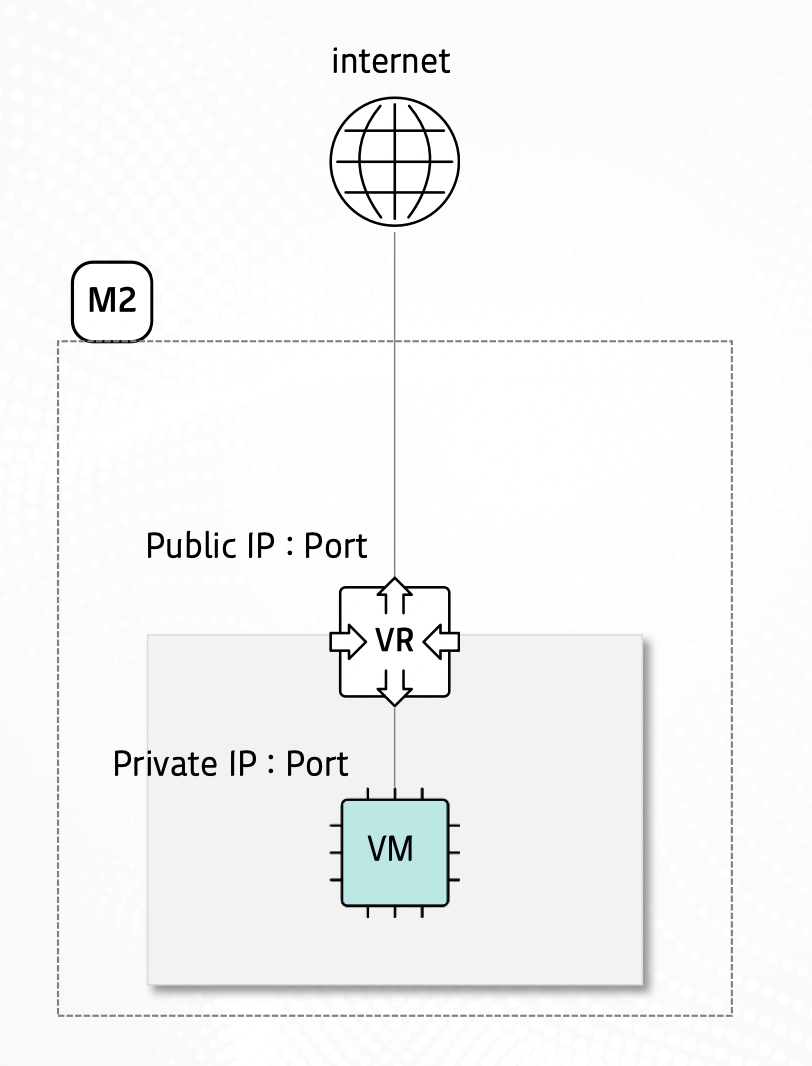
조금 더 자세히 설명드려 보자면, 아래의 순서로 작업을 진행할 예정입니다. 물론 UI가 아닌 Open API를 통해서 말이죠.
| ㅇ 작업 순서: 가상서버생성(userdata를 활용한 웹서버 설치/설정) -> 접속 설정 작업(포트포워딩 룰) -> 브라우저를 통한 확인 -> 자원 삭제 |
KT Cloud Open API를 통한 시나리오 구현
그럼, 지금부터는 KT Cloud Open API를 통해서 위의 시나리오를 실행해 보도록 하겠습니다.
KT Cloud Open API 사용에 대한 기본 지식(SDK 받기, 경로 설정 등)은 1편을 참조해 주세요.
우선 이번 시나리오에서 사용할 python 모듈을 로드합니다.
|
1
2
|
import pandas as pd
import time
|
cs |
Python SDK 중에서 Server 모듈을 로드하고, 가상서버 생성에 필요한 스펙 정보를 확인하기 위한 조회성 API를 호출하도록 하겠습니다.
|
1
2
3
4
5
|
## SDK의 Server 모듈 import, 상품 스펙 정보 조회 api(listAvailableProductTypes) 호출
import server
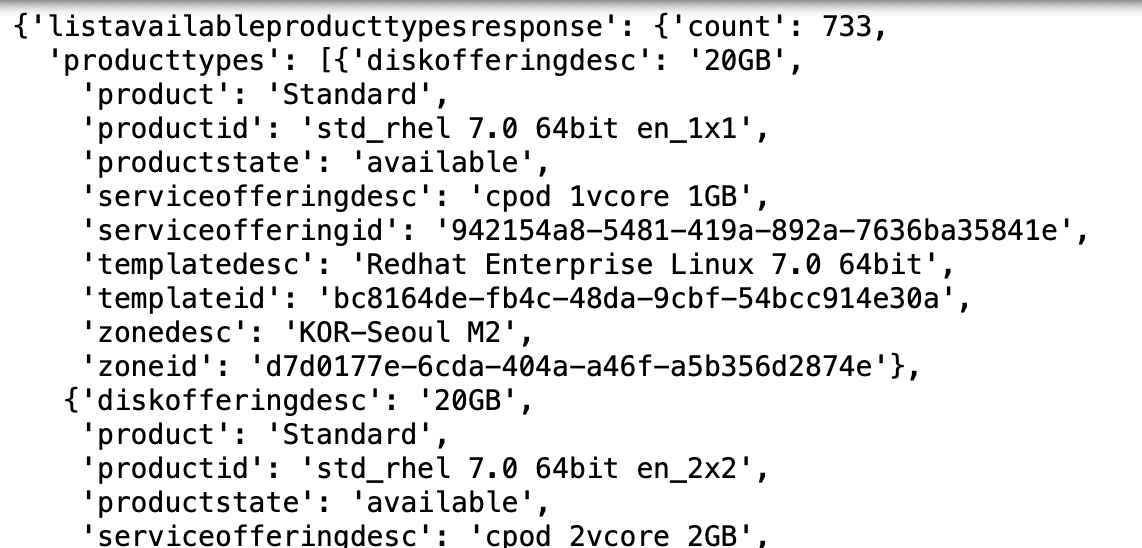
response = server.listAvailableProductTypes(zone="KR-M2")
response
|
cs |
listAvailableProductTypes API는 KT Cloud에서 제공하는 가상서버의 메타 정보(상품 타입, 스펙, 존 정보 등)를 제공해줍니다. 하지만 아래와 같이 json 혹은 xml 형식으로 결과값이 표시되므로 가독성은 좋지 않습니다.
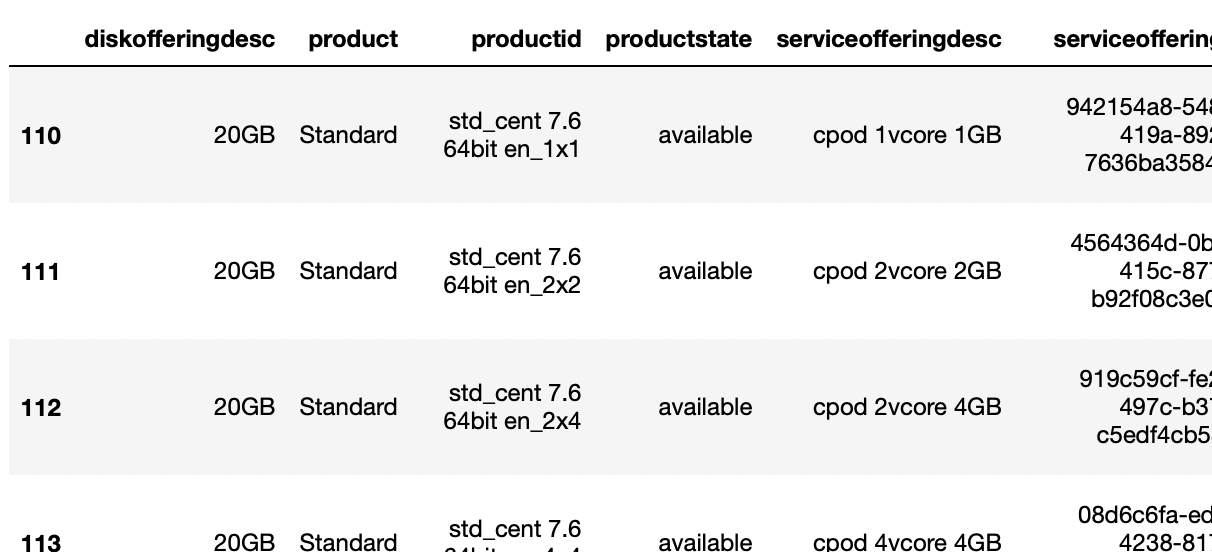
그래서 아래와 같이 정보 확인과 탐색 작업이 보다 원활하도록 Python Pandas 패키지를 활용하도록 하겠습니다. Pandas의 DataFrame 구조에 저장해서, 필요한 OS 정보를 가진 데이터만 추출해 보고자 합니다.
|
1
2
3
4
5
6
|
# 탐색 작업을 위해, pandas 패키지의 DataFrame 구조에 조회 결과를 저장
df_pd = pd.DataFrame.from_dict(response['listavailableproducttypesresponse']['producttypes'], orient='columns')
# Available Product Type 리스트에서 OS가 Centos 7.6 인 목록 조회
df_pd[df_pd["productid"].str.contains('std_cent 7.6 64')]
|
cs |
위의 코드를 실행하면, 아래와 같이 Centos 7.6 64bit OS에 대한 정보만을 확인할 수 있습니다.보다 편안하게 가상서버 생성에 필요한 정보를 확인할 수 있는 것입니다.
이제 부터는 본격적으로 KT Cloud Open API를 이용해서 '가상서버를 생성'하는 작업을 진행해 보도록 하겠습니다.
가상 서버 생성을 위해서는 기본적으로 template id(OS), service offering id(Spec), zone 정보가 필요합니다.
여기에 덧붙여서 이번 시나리오에서는 웹서버 설치를 동시에 진행하므로, userdata 파라미터에 관련 내용을 기술해서 작업을 진행하겠습니다.
|
1
2
3
4
5
6
7
8
9
10
11
12
13
14
15
16
17
18
19
20
21
22
23
24
25
26
27
28
29
30
31
32
33
34
35
36
|
# VM 생성 : deployVirtualMachine
# required: service offering id, template id, zone id
## service offering: 1vcore 1GB
## os: Centos 7.6 64bit
## zone: M2
# userdata로 httpd 설치
user_data_tmp = '''
#!/bin/bash
yum install -y httpd
echo "안녕하세요 KT Cloud입니다! 환영합니다!" > /var/www/html/index.html
systemctl start httpd.service
systemctl enable httpd.service
systemctl stop firewalld
systemctl disable firewalld
'''
response_deploy = server.deployVirtualMachine(zone="KR-M2",serviceofferingid="942154a8-5481-419a-892a-7636ba35841e",templateid="c38c44e3-894f-4bf6-aeec-0fc90d37d40f",userdata=user_data_tmp)
temp_job_id = response_deploy["deployvirtualmachineresponse"]["jobid"]
#비동기(async) API 요청에 대한 처리 상태 조회: queryAsyncJobResult
response_q = dict()
while(True):
response_q = server.queryAsyncJobResult(zone="KR-M2",jobid=temp_job_id)
print("job status: "+str(response_q["queryasyncjobresultresponse"]["jobstatus"]))
if response_q["queryasyncjobresultresponse"]["jobstatus"] != 0:
print(response_q["queryasyncjobresultresponse"])
break
time.sleep(5)
print("VM 생성 완료")
|
cs |
위의 코드에서는 'deployVirtualMachine' 과 'queryAsyncJobResult'라는 2개의 Open API가 호출되었습니다.
'deployVirtualMachine'은 의미 그대로 가상 서버를 생성하기 위한 작업을 수행합니다. 하지만 가상서버를 만드는 과정은 비동기 작업(async job)이기 때문에 해당 API의 호출 결과(response)로는 작업 결과를 바로 알 수 없습니다. 따라서
'queryAsyncJobResult' API를 일정 시간 간격으로 호출하는 방식을 통해서 작업 진행 상태를 확인합니다 .
가상 서버가 만들어졌다면, 다음은 외부 인터넷망에서의 접속을 위한 작업을 수행할 차례입니다.
사용 가능한 공인 IP를 확인하고, 신규 생성된 가상 서버와 접속 설정을 하는 과정을 Open API로 진행하는 것입니다.
listPublicIpAddresses(공인 IP 목록 확인) -> createPortForwardingRule (접속 설정: 공인 IP:Port와 사설 Port연결)
|
1
2
3
4
5
6
7
8
9
10
11
12
13
14
15
16
17
18
19
20
21
22
23
24
25
26
27
28
29
30
31
|
# 접속설정(포트포워딩 룰) : Create Portforwading Rule
## Public IP:Port와 VM의 Private IP:Port를 연결해서, 외부와 통신이 가능하도록 설정
## Public IP 리스트 조회, 해당 리스트의 첫번째 IP를 선택
response_ip_list = server.listPublicIpAddresses(zone="KR-M2")
response_ip_list
(publicip_id,publicip) = response_ip_list['listpublicipaddressesresponse']['publicipaddress'][0]['id'],response_ip_list['listpublicipaddressesresponse']['publicipaddress'][0]['ipaddress']
print(publicip_id+', '+publicip)
# createPortForwardingRule
## Public/Private Port 모두 80으로 연결
response_create_port = server.createPortForwardingRule(zone="KR-M2",ipaddressid=publicip_id,privateport='80',publicport='80',protocol='TCP',vmid=vm_id)
response_create_port
temp_job_id = response_create_port["createportforwardingruleresponse"]["jobid"]
#비동기(async) API 요청에 대한 처리 상태 조회: queryAsyncJobResult
response_q = dict()
while(True):
response_q = server.queryAsyncJobResult(zone="KR-M2",jobid=temp_job_id)
print("job status: "+str(response_q["queryasyncjobresultresponse"]["jobstatus"]))
if response_q["queryasyncjobresultresponse"]["jobstatus"] != 0:
print(response_q["queryasyncjobresultresponse"])
break
time.sleep(5)
print("createPortForwarding 완료")
#Get Portforwarding Rule ID
p_rule_id = response_create_port["createportforwardingruleresponse"]["id"]
|
cs |
위의 과정을 통해 가상서버가 공인 IP에 80포트로 연결이 되었습니다. 그러면 실제로 브라우저를 통해서 확인해 보겠습니다.
|
1
2
3
4
5
|
#browser를 통한 접속 확인
## userdata를 통해 VM 생성 시 설치한 웹서버(httpd)에 대한 확인
import webbrowser
url = "http://"+publicip+':80'
webbrowser.open(url)
|
cs |

위와 같이 브라우저를 통한 확인까지 완료되었다면, 남은일은 자원을 깨끗이 정리하는 것이겠죠.
배포된 자원의 정리 역시 Open API를 통해서 가능합니다. 아래 코드를 보시면 그리 어렵지 않게 가능하다는 것을 아실 수 있습니다. 한가지 주의할 점은 자원 배포와는 역순으로 진행하셔야 한다는 것입니다.
deletePortForwardingRule(접속 설정 삭제) -> stopVirtualMachine (가상 서버 정지) -> destroyVirtualMachine (가상 서버 삭제)
|
1
2
3
4
5
6
7
8
9
10
11
12
13
14
15
16
17
18
19
20
21
22
23
24
25
26
27
28
29
30
31
32
33
34
35
36
37
38
39
40
41
42
43
44
45
46
47
48
49
50
51
52
53
54
55
56
57
58
|
# VM 삭제 시나리오: 접속 설정(PortForwarding)삭제 -> VM 정지 -> VM 삭제
## PortForwarding 삭제: deletePortForwardingRule
response_delete_port = server.deletePortForwardingRule(zone="KR-M2",id=p_rule_id)
response_delete_port
temp_job_id = response_delete_port["deleteportforwardingruleresponse"]["jobid"]
#비동기(async) API 요청에 대한 처리 상태 조회: queryAsyncJobResult
response_q = dict()
while(True):
response_q = server.queryAsyncJobResult(zone="KR-M2",jobid=temp_job_id)
print("job status: "+str(response_q["queryasyncjobresultresponse"]["jobstatus"]))
if response_q["queryasyncjobresultresponse"]["jobstatus"] != 0:
print(response_q["queryasyncjobresultresponse"])
break
time.sleep(5)
print("deletePortForwarding 완료")
# VM 정지: stopVirtualMachine
## required: VM ID
response = server.stopVirtualMachine(vmid=vm_id,zone="KR-M2")
print(response)
#비동기(async) API 요청에 대한 처리 상태 조회: queryAsyncJobResult
temp_job_id = response["stopvirtualmachineresponse"]["jobid"]
while(True):
response_q = server.queryAsyncJobResult(zone="KR-M2",jobid=temp_job_id)
print("job status: "+str(response_q["queryasyncjobresultresponse"]["jobstatus"]))
if response_q["queryasyncjobresultresponse"]["jobstatus"] != 0:
print(response_q["queryasyncjobresultresponse"])
break
time.sleep(5)
print("VM Stop 완료")
# VM 삭제: destroyVirtualMachine
## required: VM ID
response = server.destroyVirtualMachine(vmid=vm_id,zone="KR-M2")
#비동기(async) API 요청에 대한 처리 상태 조회: queryAsyncJobResult
while(True):
response_q = server.queryAsyncJobResult(zone="KR-M2",jobid=temp_job_id)
print("job status: "+str(response_q["queryasyncjobresultresponse"]["jobstatus"]))
if response_q["queryasyncjobresultresponse"]["jobstatus"] != 0:
print(response_q["queryasyncjobresultresponse"])
break
time.sleep(5)
print("VM Delete 완료")
|
cs |
관련 정보
KT Cloud Open API 활용을 위해 추가 참조하실 수 있는 정보 공유드립니다.
감사합니다.
1.Open API 소개 1편 - https://ktcloudplatform.tistory.com/92
2. Open API 매뉴얼 - https://cloud.kt.com/docs/open-api-guide/g/guide/how-to-use-cloudstack
'Tech Story > Cloud Architecture' 카테고리의 다른 글
| ‘3高 시대’, 엔터프라이즈 비용 절감 Tip (feat. 클라우드 더불어 HAC ) (0) | 2022.08.26 |
|---|---|
| kt cloud Dev Tools - IMDB Redis 환경 구성 #1 (0) | 2021.11.03 |
| 관리형 메시지 브로커 서비스 - Message Queue 신규 출시 (0) | 2021.10.12 |
| Cloud에 관한 거의 모든 지식#5 (Cloud와 레그 테크) (0) | 2021.09.24 |
| DNS 네임 서버를 직접 구축해보자! (feat. BIND9) (0) | 2021.09.06 |